abe.®Pu Injection Foam To Prevent Water Ingress In Structures
All the relevant product data sheets and MSDS’s are to be read for additional information i.e. pot life, mixing instructions, surface preparation, ventilation, temperature and application limitations, etc.
Surface Preparation
The surface must have a minimum thickness of 40 mm and a minimum compressive strength of 25 MPa.
The surface must also provide a minimum tensile adhesion strength of 1.5 MPa. All surfaces have to be completely dry, sound, clean, free of friable and deleterious material, paint, laitance, mould release agents, oil, curing compounds, mud, plaster and any contaminants which might impair the bond. The recommended process is typically achieved by shot blasting, vacuum blasting or vacuum grinding.
Final floor levels are not to have falls less than 1 in 400 (self-levelling).
Heavy trafficked areas
Consult a.b.e.® for additional
information.
Tiled bases
Ceramic, quarry, terrazzo, or similar tiles are sound and well bonded and not damaged. It is recommended that the surface is prepared by shot blasting, vacuum blasting or vacuum grinding.
All floor imperfections and holes need to be filled using epidermix 201. Holes deeper than 40 mm need to be repaired using dura.®rep HS including epidermix 344 wet to dry epoxy primer prior to placing abe.®screed SLC P.
Bonding / Priming
Do not allow the primer to pond and ensure that it is completely dry before the application of the screed. The drying time is approximately 3 hours at 20 ºC depending on absorbency, temperature and humidity, otherwise overnight.
The recommended substrate temperature is between 10 °C and 25 °C, but no less than 5 °C. The temperature of the substrate should exceed the “dew point” by 3 °C during application and hardening.
Temperatures should not fall below 5 °C in the 24 hours after
application.
For the best results apply the first coat late afternoon while the substrate is cooling then follow with the second coat early the next morning.
COVERAGE – abe.®prime SLC acrylic primer:
5 m2 per litre per coat (0.2 litres/m2).
Two coats are always recommended, for non-absorbent surface
one coat may suffice.
Mixing
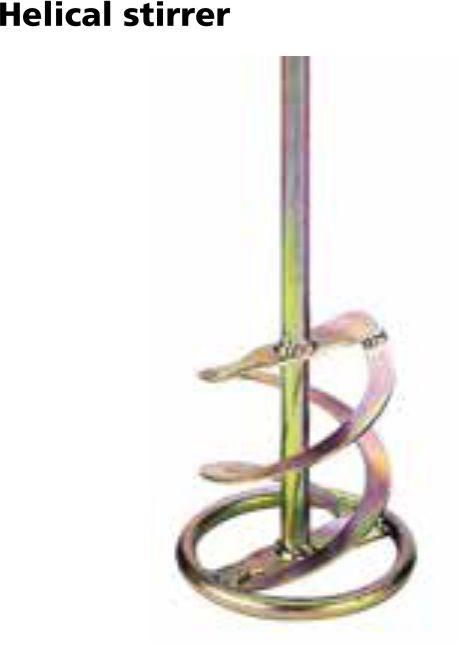
Mechanical mixing using a heavy duty drill and helical mixer, or a continuous mixer/pump is the recommended mixing method. When using a heavy duty drill/stirrer for single bag mixing (25 kg) the drill/stirrer should provide a minimum of 1100 W input power, 600 W output power, torque 45 Nm and variable speed of 0 to 700 rpm, including a heavy duty paddle having a 120 mm
diameter and helical stirrer height of 100 mm suitable for mixing cement mortars and grouts (see typical illustration of a helix stirrer on the last page). The rotation of the stirrer should be such that the material is lifted from the bottom of the mixing container upward during mixing.
Correct mixing and proportioning of the abe.®screed SLC P is essential for good results.
Add 5 L of clean potable water to the mixing vessel and whilst slowly stirring, slowly add the 25 kg of powder and mix for 1 minute, once all the powder has been added mix for a further 4 to 5 minutes at a medium speed to induce mechanical shear and good dispersion of the polymers to result in a smooth, lump free homogenous consistency.
Avoid mixing at high speeds as this may entrap air.
Do not exceed 5 L of water per 25 kg of abe.®screed SLC P.
Warning: Mixing must be done carefully by keeping the stirrer head underneath the material to reduce the entrapment of air.
Working temperature of the mix must be in the range of 5 °C to 25 °C. Use warm water (25 ºC) in cold conditions. Excess water may lead to a friable surface and will reduce the strength of the abe.®screed SLC P. Do not mix more abe.®screed SLC P than can be applied in 10 minutes.
If loss of workability is experienced due to the product standing too long prior to placing, never re-temper the mix by the addition of water, discard the product and mix fresh product. It is the responsibility of the flooring/main contractor to record the relevant product batch numbers.
FLOW RING TEST
We do recommend that each new batch of product is tested using the “Flow Ring” test to ensure that the correct flow properties are obtained.
Equipment:
Steel cylinder (flow ring), nominally 30 mm diameter x 50 mm high, to contain 35.3 ml (cm3) as per ASTM C 1708. Stainless steel plate, melamine, glass or a non-absorbent board. Measuring tape or ruler. Container to collect the screed sample. Cleaning equipment (water and cloths).
Procedure:
Ensure that the equipment is clean and pre-dampened before use. (no free water).
The material to be tested is taken from the discharge end of the pump hose (or for hand application, from the container of mixed material before it is laid).
Place the flow ring centrally on the glass plate and place this assembly on a firm horizontal surface not to depart from horizontal by more than 1 in 400.
Within 30 seconds from the completion of mixing, completely fill the flow ring, immediately lift the flow ring and simultaneously start the timer. Lift the flow ring from the glass plate in a vertical direction to a height of 50 mm to 100 mm within 2 seconds and allow the material to empty from the ring onto the glass plate.
Allow the mortar to spread for 4 minutes and measure the diameter of the spread in two directions at right angles using the length-measuring device. Record the average diameter as the flow rate of the self-levelling material.
The average diameter of the circle of material (flow rate) must be between 160 mm to 190 mm at a water demand of 5.0 litres per 25 kg of powder at 20 oC + 3 oC per 25 kg bag of abe.®screed SLC P.
Notes:
If the circle diameter is too big: Water content is too high, screed strength will be reduced, risk of segregation and bleeding, giving a weaker and / or a dusty surface.
If the circle diameter is too small:
Water content is too low, screed strength will be high, selflevelling will be poor.
Application
To the dry abe.®prime SLC acrylic primer pour or pump the mix over the concrete surface immediately after it has been mixed. For pumped application, ensure the continuity of electricity and water supply is available. Pump the abe.®screed SLC P onto the floor in a continuous operation, feeding fresh material into a wet edge by means of a triangulated notched trowel or pin rakes to distribute the product.
abe.®screed SLC P will level out to a smooth, even finish. Where necessary, release small air bubbles from the newly laid screed using a spiked roller. This practice must be adopted within 5 minutes of application to avoid interfering with the final levelling properties.
Any lumps found in the product are to be removed before placing
the product.
Bay size limitations by using a temporary stop edge
• Pump applications: 15 m
• Hand applications: 5 m
• Suitable temporary stop edges to be placed in areas where
the abe.®screed SLC P in not required
• For best flowability when placing by hand or pump a
minimum thickness of 5 mm is recommended
• Maximum thickness: 20 mm
• The product can be feather edged
abe.®screed SLC P is to be mixed and laid in accordance with the instructions of a.b.e.®.
Joints
All joints in the sub-floor are to be honoured and not screeded over. Cutting of the joints to coincide with the existing sub-floor joints must take place as soon as the joint edges of the product will not ravel from the cutting process, typically within 12 and 24 hours after product application.
After Screeding
It may be necessary to use a sanding machine (or hand stone) to remove surface defects such as dip marks or to smooth across the line of temporary joints at bay edges or doorways. This may be done one day or later before the product has gained full strength.
Curing
Areas to be screeded must be weather tight, i.e. all roofs, windows and doors are to be covered as this may lead to cracking and crazing. The screed should be protected from draughts and strong sunlight during and for 24 hours after the screed is laid.
Coverage
1.7 kgm ² per mm thickness
34 kg/m² at 20 mm thick
Cleaning Of Equipment
Tools, brushes and mixing equipment should be cleaned with water immediately after use and before material has set. Hardened material can only be removed by mechanical means.
Protection On Completion
Ensure the room has sufficient ventilation to allow the screed to dry. Ensure adequate protection from other trades and traffic after installation, this includes the primer which must be free of dirt and dust before applying the screed, access should be restricted for 24 hours. Normal site traffic and erection of partitions on the screed is permitted after the screed has hardened, typically 24 to 48 hours. Prevent contamination/damage by the following trades, e.g. plastering, including water spillage and electrical installations.
Hardening and Drying Times
abe.®screed SLC P may be walked on after 6 – 8 hours @ 25 °C, and may be sanded at joints if required 24 hours after application. The floor covering can be installed after 24 hours, depending on the type of finish required, the dryness of abe.®screed SLC P screed and ambient conditions. It is recommended to do a moisture test to verify the moisture content.
Temperature and Relative Humidity
Internal air and floor temperatures must exceed +5 °C. The RH of the concrete floor must not exceed 95%, but where moisture sensitive floor coverings are to be laid soon after the abe.®screed SLC P application, the RH of the base must be in accordance with the relevant floor overlay manufacturers specification.
Floor Finishes
It is the responsibility of the main contractor to check the moisture content or relative humidity of the base before floor finishes are laid and that it meets the requirements of the flooring material.
Health and Safety
Product safety information required for safe use is not included. Before handling, read product and safety data sheets (MSDS) and container labels for safe use, physical and health hazard information. The safety data sheet is available from your local a.b.e.® sales representative.
Important Note
This data sheet is issued as a guide to the use of the product(s) concerned. Whilst a.b.e.® Construction Chemicals Limited endeavours to ensure that any advice, recommendation, specification or information is accurate and correct, the company cannot – because a.b.e.® has no direct or continuous control over where and how a.b.e.® products are applied – accept any liability either directly or indirectly arising from the use of a.b.e.® products, whether or not in accordance with any advice, specification, recommendation, or information given by the company.
Further Information
Where other products are to be used in conjunction with this material, the relevant technical data sheets should be consulted to determine total requirements. a.b.e.® has a wealth of technical and practical experience built up over years in the company’s pursuit of excellence in building and construction technology.

